Mounting NTFS on Linux
Mounting NTFS drives on Linux and why the hell its so hard for Plex to read it. This guide shows one of the ways to add NTFS drives to your Fedora/CentOS/Ubuntu Linux distribution.
NTFS drives
Types of drives
When working with NTFS formatted devices in Linux, we most often come across two types. First, you have internal NTFS drives/partitions from a Windows install or an old Windows drive that you weren’t using any more. Second, you have a USB externally mountable drive that you were using on you Windows PC. So, now you decided you wanted to try and use that drive for Plex Media Server on your new shiny Linux install. In this guide we’ll cover Fedora/Ubuntu and specifically the ntfs-3g package that allows Linux to mount NTFS drives and have them actually usable.
Before we dive into drives, devices, fstab, ntfs-3g, UUIDs (and assuming you don’t know how to control permissions or have only a vague idea of how to use them), it’s recommended that you read the Linux Permissions Guide.
Getting started
Getting back to the fun stuff: So, assuming you’ve already attached your NTFS drive to your Linux machine, chances are that it’s already automounted and you have probably even been able to see data on it from your local user. On Linux this is usually the case when using USB drives; the automounter daemon kicks off a mount of the drive when you connect it via USB, but it does this as your local user and with local user permissions. So, to get around this we need to tell Linux where to mount that drive and how.

Installing the required packages and setting up fstab
We will go through the package installation on both Fedora and Ubuntu, and also show you how to configure your fstab file for automounting of that specific drive.
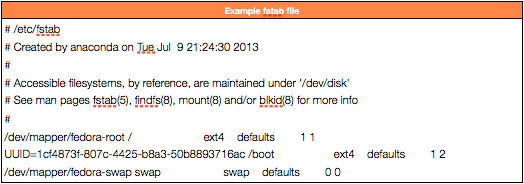
First off we’ll go through what the fstab file is and what it does. It’s a text file placed in /etc named fstab (/etc/fstab). It contains the information of what filesystems need to be read and mounted (connected) to your linux server during boot. It can be both internal drives/partitions as well as USB drives and even network shares. Below is an example of how the fstab file can look like.

To under stand it better we will put it into a form and explain each field in the file. Below we have two example lines from an fstab file:

The fields have the following meaning and impact on the filesystem mounting:
- device: device is the reference to actual device the will be mounted. This can be /dev/sda1 or as in the example/dev/mapper/fedora-root. It can be used as a direct reference to the device file, or in the case of using UUID, by entering UUID=<deviceUUID>
- mountpoint: This field defines where the device gets mounted. So /, /var, /usr or even /media/ntfs if you want your drive mounted there. (Don’t play with re-arranging where you mount your system drives as it will break the system)
- fs type: This field defines what type of filesystem Linux will try to mount the drive with. If this is not the correct type then you cannot mount the drive. Examples of types of filesystem are ext4, xfs, hfs and ntfs-3g.
- options: This is where we define extra or specific options we need to mount the drive to our needs. A huge list of options per filesystem type exist and can be found here: http://linux.die.net/man/8/mount and here for ntfs-3g http://linux.die.net/man/8/mount.ntfs-3g
- dump: (1=backup, 0=don’t backup)
- fsck order: Here is where we define if the drive should be checked on boot/mount. 0 means don’t fsck. Other values define the order in which to fsck ordering 1-X
Now that we have gotten a quick overview of the fstab file, we can move on to getting started at installing packages. For both Linux distributions you have to open a terminal window. Then run the respective command to get ntfs-3g package installed.
Ububtu:

Fedora:

Once you have the ntfs-3g package installed, the steps are the same for both Linux distributions.
Now we need to do some pretty tricky stuff to ensure that we catch the unique ID of the NTFS drive and print out a text line you can add to fstab. As root on you server you need to run the next set of commands:
Elevate to root:

Catch UUID command and spit out fstab line (THIS HAS TO BE ON ONE LINE):

If you’re unsure if you can type all that in, you can get it from plexrpms.markwalker.dk and pipe it through a script like so (run as root):
curl -s plexrpms.markwalker.dk/guides/get_ntfs_uuid_fstab.sh |sh
If you are unsure what’s in it and want to see it before you run, you can cat the output like so:
curl -s plexrpms.markwalker.dk/guides/get_ntfs_uuid_fstab.sh |cat
The command should if, you have any ntfs drvies attached to your system, spit out a line or two if you have more drives that look similar to this:
UUID=1cf4873f-807c-4425-50b8893716ac /media/nftsdrive ntfs-3g permissions,auto 0 0
In this example I’m using /media/nftsdrive an example mountpoint. If you want to change this you will have to modify that line in the command run above. Once we have that command it should be possible for us to get things set up in fstab. But, as with all mounted drives, we need to ensure that the mountpoint we are going to be using exists. So, check that your mountpoint is in place (and don’t use any mountpoint under /home/username, as it will only break things). Run the next command to verify that the directory is in place. Check mountpoint:

If the mountpoint isn’t in place and you get an error back etc. Then run the next command to create it. Create mountpoint:

Now we are ready to add the mount reference in fstab. Open any editor of your choice, vi/emac/nano or even graphical texteditor in the GUI, just make sure you run them all as root or administrator; it’s the only way we can edit the fstab file.
As an example I will use vi:

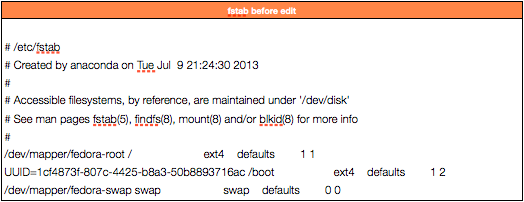
It should show you a file similar to this one:

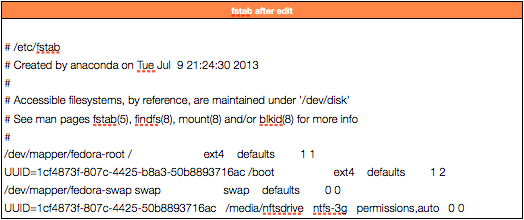
Now we want to add the previous output that we had before, being:
UUID=1cf4873f-807c-4425-50b8893716ac /media/nftsdrive ntfs-3g permissions,auto 0 0
In the editor type: SHIFT + G
Followed by: SHIFT + A
Then hit: RETURN
This should put us at the bottom of the file and ready to add the mounting line we need to mount the NTFS drive so we can actually use it.
The next step is to paste the line the one-liner command gave us, with any corrections that you did.

Once you have entered the correct line (and this has to be correct otherwise it won’t work and you will have to go back and edit this file again), all you need to do is run the mount command:

If all goes well you should have your NTFS drvie mounted in /media/ntfsdrive. With the mount options we have used you should be able to change permissions on the drive as well. Ain’t that cool?!?
To make sure that Plex can read the files on your NTFS drvie simply run:

Enjoy happy Plexness from your Plex Media Server.
