Tip!: The Media Optimizer feature requires Plex Media Server version 0.9.14.3 or newer.
Setting up an optimization for media is easy to do.
Choosing Media to Optimize
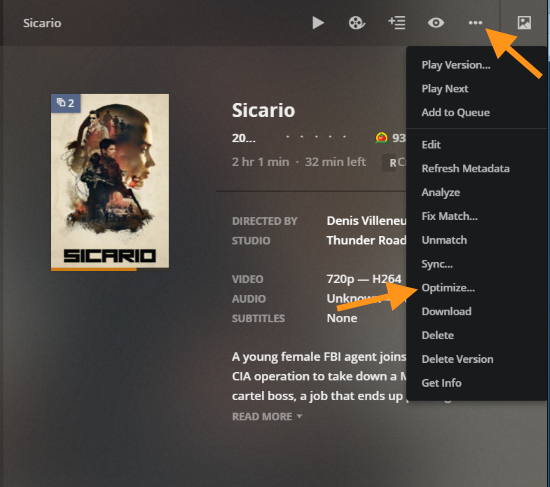
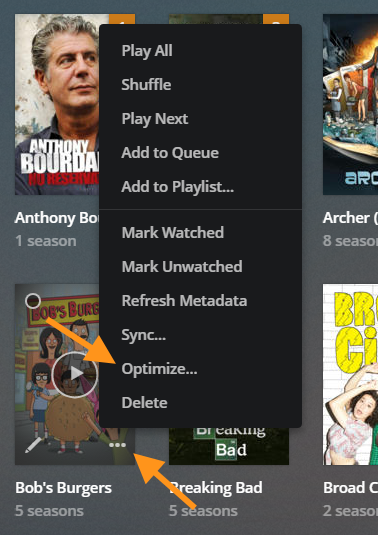
You can create optimized versions for media is using the Optimize… action in the Plex Web App. That can be found under the … menu in the top actionbar.

That allows you to initiate an optimization for a specific item from the preplay screen, for a season or show in the TV library, or from the library level itself. It will also work when you filter and sort content, which means you could create an optimization for the “5 most recently added comedy movies”, for instance. You can also access the “Optimize…” action from the poster for a specific item.

Optimize Settings
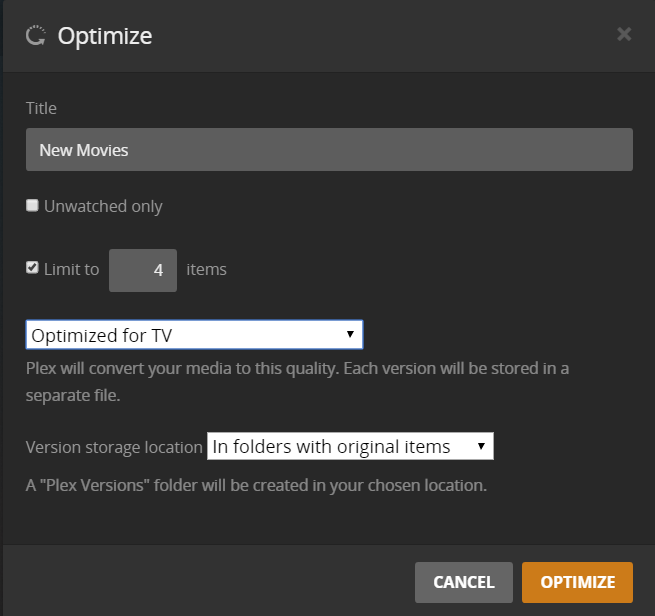
Choosing that menu item will open the Optimize window.

Title
Select a title to identify this optimization. This will help you identify it when you need to manage your optimizations.
Unwatched Only
Choose whether or not the optimization should apply only to items that have not been watched. If this option is selected, then once an item has become “watched” it will no longer be part of the optimization job.
For instance, if you optimized the “5 most recently added unwatched movies” and then watched one of those 5, the optimized version for that particular movie would automatically get removed.
Limit
Limit the number of items to optimize.
Optimization Quality
You can choose one of the preset optimization qualities or select your own. The options:
- Optimized for Mobile – 4 Mbps 720p – Video is limited to 720p and 4 Mbps and audio streams will be preserved when possible or transcoded to AAC 2.0 if needed. SRT subtitle streams will be copied as sidecar files and other subtitle formats will be burned into the video if selected (prior to optimization).
- Optimized for TV – 8 Mbps 1080p – Video is limited to 1080p and 8 Mbps and audio streams will be preserved and transcoded to AAC or AC3 if needed. SRT subtitle streams will be copied as sidecar files and other subtitle formats will be burned into the video if selected (prior to optimization).
- Original Quality – This will use the original resolution and won’t place any bitrate limitations. If the audio or video streams are already compatible with the MP4 container, they’ll be copied as-is. Transcoding can still occur if the original video is not compatible.
- Custom – Select custom settings (see below)
Custom
If you select the Customize option, you can choose which profile to use as well as the bitrate limitation.


The profile will let you target a particular Plex app or go more generic with the “Universal Mobile” or “Universal TV” profiles.
You can select a bitrate limitation up to 20 Mbps.
Version storage location
Choose where the optimized versions should be stored.

- In folders with original items – A “Plex Versions” folder will be created to house the optimized version inside the folder that houses the corresponding source file.
- Folder Paths – You will have an entry corresponding to the path for each library location you’ve specified for the library. The “Plex Versions” folder will then be created under the selected path.
Tip!: If you want to keep all optimized versions together in a custom location, add that location to your library by Editing Libraries, then select it here.
Save the Optimization
Once you’ve chosen the desired settings, press the Optimize button. A confirmation dialog will appear. You can follow the here link to jump straight to the Conversion queue to monitor the conversion, if you wish.
Related Page: Conversion Queue
